ChIP Troubleshooting and Optimization

Chromatin immunoprecipitation (ChIP) is an important application to help determine where transcription factors bind or identify epigenetic changes at a gene of interest. As with most applications, understanding and using the right protocol is critical for success. But, when that protocol doesn’t work, it's hard to know where things have gone wrong. Here, we'll discuss 3 major areas to optimize or troubleshoot your ChIP experiments.


1. Chromatin Quality

The quality of the chromatin going into the IP is one of the most important aspects of a ChIP assay. Chromatin can degrade quickly, so ensure you always keep your samples on ice, and don't forget to add protease inhibitors during cell lysis. Once you've crosslinked and lysed your cells, there are two widely-used techniques for shearing chromatin: sonication and enzymatic digestion.


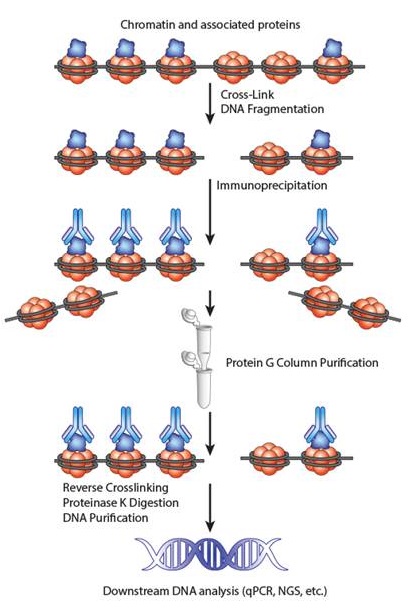
Overview of a ChIP experiment.
  • Enzymatic digestion utilizes an enzyme like micrococcal nuclease (MNase) which digests nucleic acids at a specific sequence. While this is a milder digestion compared to sonication, it does exhibit sequence bias.

     
  • Sonication uses mechanical shearing and can be advantageous when you are working with cells that are hard-to-lyse and unlike enzymatic digestion, it is an unbiased shearing method.

     
    • Probe sonicators use a probe placed directly in your sample. While this allows you to use shorter sonication times, it can also result in foaming of the sample and typically, you can only sonicate a single sample at a time. Because the probe is touching the sample directly, you need to ensure that you do not cross-contaminate your samples during the sonication.
       
    • Water bath or cup horn sonicators allow you to place all of your samples into a water bath that will indirectly deliver energy to your samples. These are ideal for sonicating multiple samples simultaneously.
So, which method is ideal for your experiments? This may depend on what protein you are pulling down or what cells you are using. If you're looking at an abundant, tightly bound protein like a histone, then either method should work well. If you are looking at a transcription factor, it may be better to use a gentler method like enzymatic digestion or try sonication using a lower concentration of detergent in the buffer. Cell types that are hard to lyse may require harsher sonication-based shearing protocols.


The exact conditions for shearing will depend on the specific cells and proteins you are analyzing. We'd recommend performing optimization experiments testing a variety of conditions before starting your IPs. Treat your cells exactly as you would for your experiment and run the resultant DNA on an agarose gel and look for shearing between 150-900 bp. With some cell types, even one extra cycle of sonication can cause over-shearing of your chromatin.


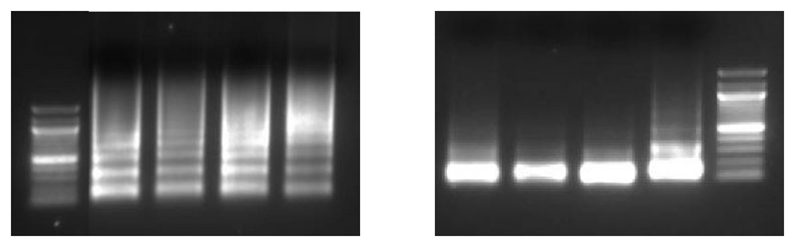
Chromatin from cell lines digested using MNase. On the left, chromatin was sheared optimally. On the right, chromatin was over-digested resulting in the majority of fragments below 400 bp. This can impair antibody binding resulting in little or no enrichment.
 
2. Immunoprecipitation
Once you’ve prepared the chromatin, the next step is to immunoprecipitate your protein of interest. Setting up the IP is a fairly simple process but there are a few things to keep in mind at this step.
  • Antibody Selection: Choose an antibody that has been validated for ChIP experiments. If this isn't possible, you can start by trying an antibody that has been validated for IP and be sure to use a positive control antibody and primers. Or, if there aren't any ChIP validated antibodies to your target, try expressing your protein with an epitope tag and using a ChIP-validated epitope tag antibody.

     
    • Some researchers prefer using polyclonal antibodies for ChIP because they can bind to multiple epitopes in case one or more epitopes were blocked during cross-linking. However, monoclonal antibodies will exhibit more lot-to-lot consistency and may be a better choice for long-term experiments.

       
  • IP Buffers: Some shearing protocols (like sonication) use a buffer containing high detergent concentrations; however, these same detergents can disrupt antibody binding. If you're using high detergents to shear, make sure that you prepare your IPs in a low detergent buffer to help dilute it out. 

     
  • Quantity of Antibody and Chromatin: The exact amount of chromatin to add to any ChIP assay will vary based on the abundance of your protein of interest or the cell type being used. Typically, you can start with 3-5 μg of chromatin per IP, but you may need to scale up. Look to the manufacturer's recommendations to determine the optimal concentration of antibody to add.
3. Controls
Using the right controls allows you to properly analyze your downstream data at the end of the experiment. If something goes wrong, looking at how your controls performed will help you understand where to focus your troubleshooting efforts. Here, we'll outline the most important controls and how to use them.
  • Antibody Controls: Use a positive control antibody like one targeting RNA polymerase II or histones to ensure that you are using good quality chromatin and appropriate conditions. Include an isotype control to account for background in your assay and to measure relative enrichment of your protein at a target gene.

     
  • Input Controls: Save 1-5% of chromatin prior to the immunoprecipitation; this is known as the input control. It allows you calculate the amount of the enriched DNA relative to the total amount of DNA in the experiment. This is especially important if you are comparing enrichment between two samples that received different treatments.


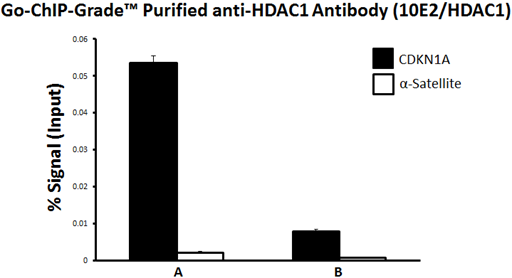
Looking at ChIP data, you can see how each of the controls help analyze the data. Here we used an anti-HDAC1 antibody (A) or an isotype control antibody (B). For each, we measured enrichment at a positive control locus, CDKN1A, and a negative control gene locus, an α-Satellite region. Lastly, by using an input control, we presented the enrichment relative to signal from the input control, so that we can directly compare samples IP'ed with two different antibodies.
  • Primers: If you're performing qPCR analysis, design primers for a 100-250 bp region around the binding site of interest and include positive and negative control primers. A positive control primer is designed around a region that you know the protein binds. For this, look into the literature or see how the manufacturer validated the antibody you are using. Also include a negative control primer for a location where you wouldn't expect to see binding. These controls will help you gauge the levels of enrichment you'd expect to see at a true binding site for your protein.
     
Optimizing and troubleshooting your ChIP experiment can seem overwhelming, but breaking the experiment down can help understand where and why the experiment has failed. For more tips and tricks to help optimize your experiment, check out our ChIP webpage or watch our ChIP protocol video.
Contributed by Kelsey Swartz, Ph.D.
ProductsHere

Login / Register
Remember me
Forgot your password? Reset password?
Create an Account